

TF500 Maintenance: E-Stop Test Before Each Job
I test the E-stop before every TF500 job because a 60,000 RPM 5-axis machine can go from normal to crash in seconds. If the stop is delayed, partial, or does not reset the right way, I do not run the job. I take the machine out of service and check the fault first.
Here’s the short version:
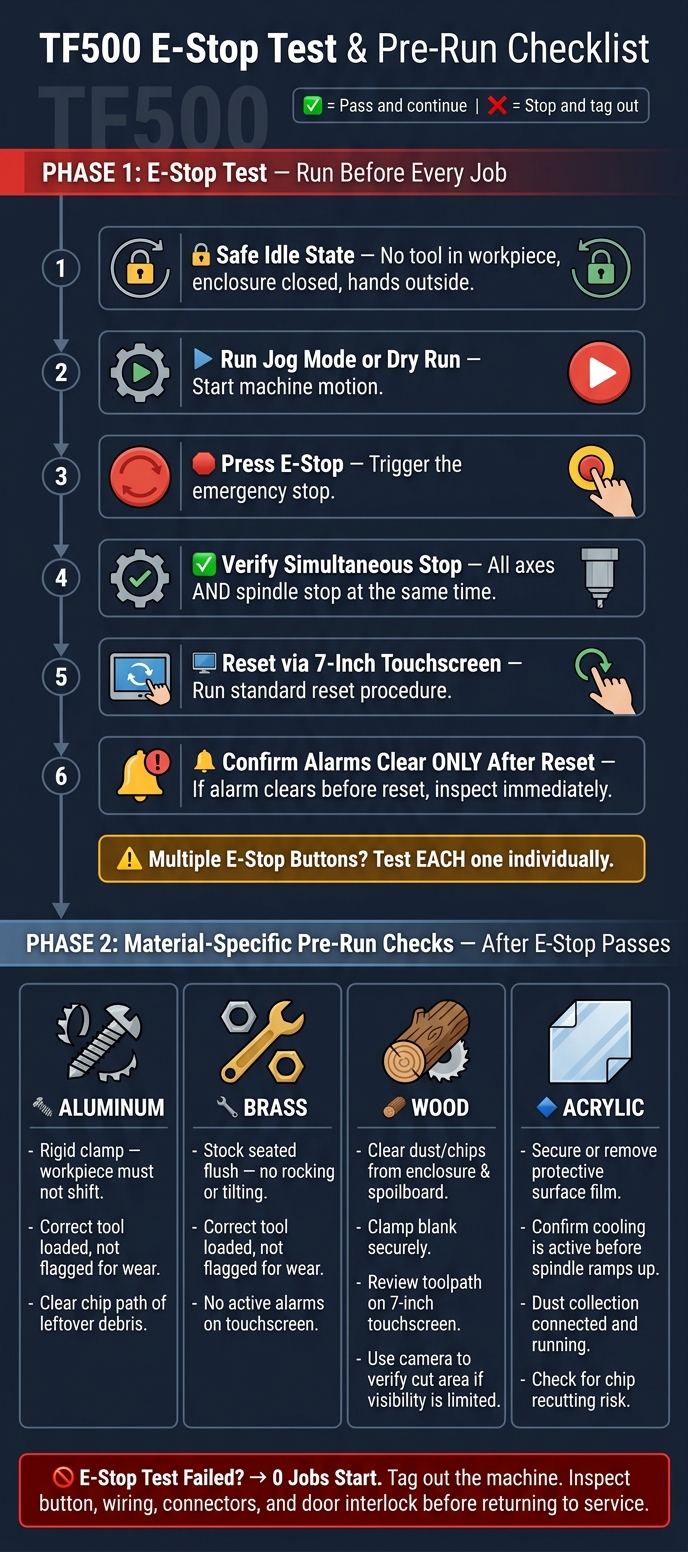
- I put the machine in a safe idle state first
- I run jog mode or a dry run, then press the E-stop
- I make sure all axes stop at the same time
- I make sure the spindle stops with the axes
- I reset from the 7-inch touchscreen
- I check that alarms clear only after reset
- If there is more than one E-stop, I test each one
- After the stop test passes, I do the pre-run check for:
- Aluminum
- Brass
- Wood
- Acrylic
This article also covers what I check for each material:
- Aluminum: rigid clamp, correct tool, chip clearance
- Brass: stock seated flat, correct tool, no active alarms
- Wood: dust cleanup, hold-down, toolpath clearance, camera check if needed
- Acrylic: surface film, cooling on, chip removal, dust collection running
And it covers what I do when the stop response is not right:
- delayed stop
- axis motion after E-stop
- spindle coasting longer than normal
- failed reset
- alarms that come back
- stop behavior that changes from test to test
A failed E-stop test is simple math: 0 jobs should start after a bad stop test. If the machine does not stop and reset the same way every time, I tag it out and inspect the button, wiring, connectors, and door interlock before I use it again.
That’s the full point of this checklist: test the stop first, then check the material setup, then start the job only if the machine returns to a clean ready state.
TF500 E-Stop Test & Pre-Run Checklist: Step-by-Step Guide
E-Stop: CNC Training Series
sbb-itb-0a29f4d
Before Each Job: How to Run a Quick E-Stop Test
Make sure the stop works and that the machine comes back cleanly after a reset.
Set Up the Machine in a Safe Idle State First
Before you test anything, put the TF500 in an idle state. That means no tool in the workpiece, the enclosure closed, and the work area clear. Check the area one more time before the test starts. Keep your hands outside the enclosure for the entire test.
What to Check During and After the Stop Test
Run the machine in jog mode or a dry run, then press the E-stop. All axes should stop at once. The spindle should stop with the axes. If you notice any delay, or if the spindle keeps moving, treat that as a problem.
After the stop, check recovery on the touchscreen. Use the 7-inch touchscreen console to run the standard reset procedure. Reset the machine with the touchscreen. Alarms should clear only after the reset. If an alarm clears without a reset, stop and inspect the system.
If the machine has more than one E-stop, test each button on its own.
Once the E-stop passes, move to material-specific pre-run checks.
Pre-Run Checks for Metal Jobs: Aluminum and Brass
After the E-stop test passes, move to the checks for the job's material before the first pass. At this stage, you're only checking startup readiness. This is not the time to tune feeds or speeds.
Aluminum: Workholding, Tool Condition, and Chip Evacuation
With aluminum, start with a rigid setup. Press on the workpiece firmly by hand and make sure it doesn't move. If it shifts at all, tighten the clamp before the spindle starts.
Next, confirm that the correct tool is loaded and that it isn't flagged for wear.
Then check the chip path inside the enclosure. Clear out any leftover debris from earlier jobs so fresh chips don't get in the way of machine motion.
Brass: Clean Ready State
Brass also calls for a rigid setup. Make sure the stock sits flush against all support surfaces with no gap. If the piece rocks or tilts even a little, re-seat it and clamp it again before moving on.
Follow the same basic pattern for brass: confirm that the correct tool is loaded and not flagged for wear. Then check the touchscreen for a clean ready state with no active alarms. If any safety input is still active, do not start the job.
Pre-Run Checks for Wood and Acrylic Jobs
For wood and acrylic, the focus shifts a bit. Instead of spending most of your time on rigidity checks, pay closer attention to debris, visibility, and heat.
Wood: Dust Control, Hold-Down, and Toolpath Clearance
Start by clearing out any leftover dust or chips from the enclosure, spoilboard, and fixturing area before you clamp the stock. Then clamp the blank securely and make sure it doesn't move.
After that, review the toolpath on the 7-inch touchscreen and check for toolpath clearance. If the cut area is tough to see, use the camera to confirm the area is clear.
Acrylic follows the same basic setup, but heat and chip control matter more.
Acrylic: Surface Protection, Heat Sensitivity, and Chip Removal
Acrylic is more sensitive to heat and chip recutting than wood. Make sure any protective film is either secured or removed so it can't snag.
Next, confirm cooling is active before the spindle ramps up. Recut chips can build heat fast, so check that dust collection is connected and running to help stop chip recutting and overheating.
What to Do If Stop Response Is Slow or Incomplete
If anything looks off during the E-stop test, treat it as a safety fault. And if the stop test fails, skip the material checklist and go straight to fault handling.
Here’s how to read the stop response and what to do next:
| Stop condition | What it looks like | Required operator action |
|---|---|---|
| Unacceptable stop response | Delayed stop, continued axis movement, spindle coasts longer than normal, partial stop, failed reset, recurring alarms | Do not start the job; remove the machine from service and inspect and report the fault |
| Unclear or inconsistent response | Stop behavior varies between tests, response is not repeatable, or status does not return cleanly after reset | Do not use the machine; keep it out of service until the fault is identified and corrected |
Take the Machine Out of Service Right Away
The moment you see a delayed stop, continued axis movement, or a reset that won’t clear on the 7-inch touchscreen, stop the job immediately. Isolate the TF500 per shop procedure, tag it out, and do not retest until the fault is found.
How to Inspect the E-Stop Circuit and Safety Inputs
Start with the E-stop button itself. Check for damage, sticking, or anything that feels off. Then inspect nearby wiring and connectors for wear, pinching, or loose connections. Also verify that the door interlock is not causing the fault.
Only clear active alarms after the machine returns to a clean ready state with no alarms. Do not resume the job until the machine resets cleanly and no alarms come back.
Conclusion: Run the Test Every Job, Keep It Short
Run the E-stop test before every job. If the stop is slow, partial, or inconsistent, keep the machine out of service until the fault is fixed.
FAQs
Why test the E-stop before each job?
Testing the E-stop before every machining job helps make sure the CNC system can stop at once in an emergency. It checks that the stop mechanism works properly before the machine starts, which can lower the risk of accidents and machine damage.
Since the machine operates at high speeds, you need to confirm that the safety circuit fully stops axis movement and tool rotation so the workspace stays safe and under control.
What counts as a failed E-stop test?
An E-stop test fails if the machine does not stop at once when you press it. That means all motion must stop, including spindle rotation and axis movement. If the machine reacts slowly, pauses before stopping, or only stops part of the motion, the test has failed.
If you still see the spindle spinning or the axes moving, stop using the machine right away. Disconnect power and contact the manufacturer or a qualified technician for inspection. This points to a critical safety defect in the emergency stop circuit.
What should I check before cutting each material?
Before each job on the TOPFAB TF500, run an E-stop test to make sure the machine stops as it should. Also check that the work area is clear and the safety enclosure door is fully closed and secured.
When cutting aluminum, brass, wood, or acrylic, confirm that the material is mounted correctly and that the right tool is loaded in the 8-slot automatic tool changer.
If the stop response feels slow or doesn’t fully stop the machine, do not proceed. Contact support.


