

5-Axis CNC Machining: A Beginner's Ultimate Guide
If you want to cut more sides of a part with fewer setups, 5-axis CNC is the step up from 3-axis. In plain terms, it adds two rotary movements so I can reach angled faces, curved surfaces, and more of the part in one clamp-up.
Here’s the short version:
- 3-axis moves in X, Y, and Z
- 5-axis adds two rotary axes
- 3+2 machining tilts, locks, then cuts
- Simultaneous 5-axis keeps all axes moving during the cut
- Desktop 5-axis machines now start around $10,000 to $20,000
- Industrial shop time often runs $125 to $200+ per hour
- Setup time for a multi-face part can drop from 60–120 minutes to 10–15 minutes
- Shorter tools can be much stiffer; a 2:1 tool can be about 8x stiffer than a 4:1 tool
What I like about this guide is that it stays focused on what a beginner needs first:
- how the axes work
- the difference between indexed 3+2 and full 5-axis motion
- what tools and fixtures to start with
- how the CAD → CAM → post → machine flow works
- how to run a safe first project in wood, acrylic, or aluminum
- when buying a desktop 5-axis machine makes sense
Bottom line: if you mostly cut flat parts, 3-axis is often enough. If you need four or more faces, angled features, curved shapes, or fewer re-clamps, 5-axis can save time and cut alignment error.
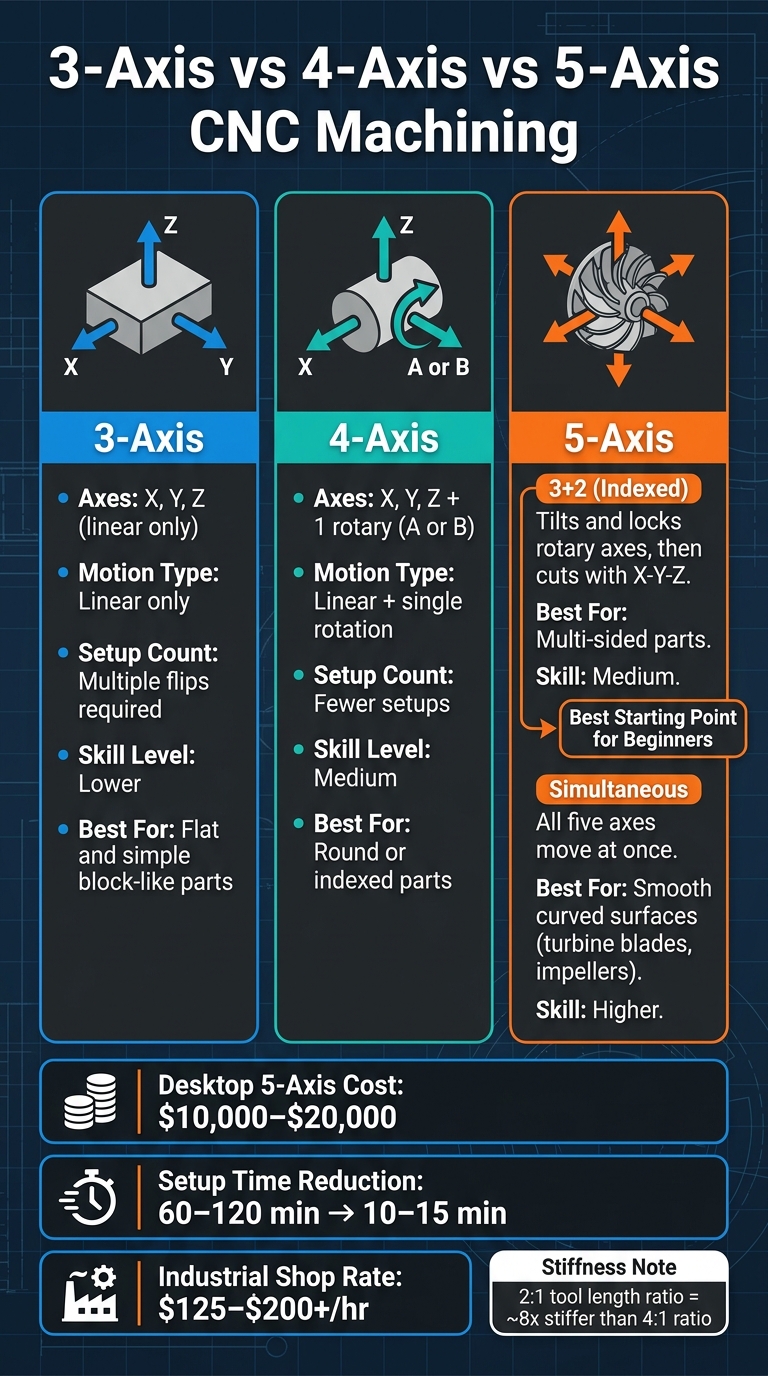
3-Axis vs 4-Axis vs 5-Axis CNC Machining: Key Differences at a Glance
5-Axis Made Easy - Parts 1, 2 and 3
sbb-itb-0a29f4d
Quick Comparison
| Machine Type | Motion | Best For | Setup Count | Skill Level |
|---|---|---|---|---|
| 3-Axis | X, Y, Z | Flat and simple parts | More setups | Lower |
| 4-Axis | X, Y, Z + 1 rotary | Round or indexed work | Fewer setups | Medium |
| 5-Axis (3+2) | X, Y, Z + 2 rotary, then lock | Multi-side parts | Often one setup | Medium |
| 5-Axis Simultaneous | All five axes move together | Smooth curved parts | Often one setup | Higher |
If I were new to this, I’d start with 3+2, simple materials, safe dry runs, and a small tool set before moving to full simultaneous work.
5-Axis Basics: Axes, Motion, and Key Terms
How 3-Axis, 4-Axis, and 5-Axis Machines Move
Now that you know why 5-axis matters, let’s look at how the axes move in practice.
A 3-axis machine moves along X, Y, and Z. That’s enough for many simple parts, but you often need to stop, flip the workpiece, and set it up again to reach other sides.
A 4-axis machine adds one rotary axis, usually A or B. That extra rotation makes it easier to machine around a part without as many manual repositioning steps.
A 5-axis machine adds two rotary axes, most often A and B or A and C. That lets the tool reach almost every face of a part in a single setup, which is a big deal when you’re cutting shapes with lots of angles or smooth contours.
| Feature | 3-Axis | 4-Axis | 5-Axis |
|---|---|---|---|
| Axes | X, Y, Z | X, Y, Z + 1 rotary (A or B) | X, Y, Z + 2 rotary (A and B or A and C) |
| Motion type | Linear only | Linear + single rotation | Linear + dual rotation |
| Setup count | Multiple flips | Fewer setups | Often one setup |
| Typical use case | Block-like parts | Round or indexed parts | Complex sculpted parts |
3+2 Positioning vs. Simultaneous 5-Axis Motion
A 5-axis machine doesn’t always move all five axes the same way. There are two main modes, and the difference matters more than many people expect.
With 3+2 machining, the machine tilts the part to an angle, locks the rotary axes in place, and then cuts using X-Y-Z motion. This approach is simpler and more rigid, so it works well for multi-sided parts.
With simultaneous 5-axis, all five axes keep moving during the cut. That’s what you need for smooth, continuous curved surfaces like turbine blades and impellers.
If you’re looking at a desktop machine, don’t assume “5-axis” means full simultaneous motion. Some machines only support 3+2 indexing, and that changes what you can do in CAM and how parts need to be programmed.
These motion modes also affect the CAM settings and post-processor you use next.
Key Terms You Need Before Using CAM
You’ll run into these terms as soon as you open CAM software:
- WCS (Work Coordinate System): The part zero, or the origin point you set on the workpiece. Machine coordinates show the machine’s own travel limits, separate from part zero. Offsets tell the controller where the part and tool are.
- Tool Center Point (TCP/TCPC): Keeps the tool tip on the programmed path while the rotary axes move.
- Toolpath: The digital route the tool follows to remove material, created in CAM software.
- Post-Processor: Converts CAM toolpaths into the G-code format your machine controller can read.
-
G-code: The final instruction file the machine uses, with lines like
G01 X10 Y5telling each axis where to go.
Machines, Tooling, and Fixturing for Desktop 5-Axis Work
What to Look for When Buying a Desktop 5-Axis Machine
Now that the motion types are clear, the next step is simple: match the machine to the parts you plan to make. For most people starting out, a compact desktop machine is the most practical place to begin.
Pick the machine type based on the work itself. Go with indexed 3+2 if you're making simpler parts that need machining on several sides. Choose simultaneous 5-axis if your parts have smooth, flowing curves that need continuous motion.
Then check the basics, one by one:
- Make sure the machine has enough travel and clearance for the part, fixture, and spindle at full tilt
- Look for a rigid tilting-rotary table or trunnion
- Require a fully enclosed safety cabinet with an E-stop and interlocked guards
- Confirm the controller supports TCPC or DWO
- Verify that the controller and post-processor work with your CAM setup
One thing beginners often learn the hard way: good documentation and post support matter a lot. A machine can look great on paper and still be a headache if the setup info is thin or the post isn't dialed in.
The TOPFAB TF500 is a beginner-focused desktop 5-axis option for users who want simultaneous 5-axis motion without a full industrial footprint. It includes a 60,000 RPM spindle, an 8-tool automatic tool changer, an enclosed safety design, and an AI-assisted workflow that reduces early CAM and programming friction.
Once you've picked the machine, tooling and fixturing decide how much of that machine's capability turns into clean, usable parts. Entry-level desktop 5-axis machines typically start around $10,000–$20,000, so it makes sense to put your money into features that fit your parts, materials, and workflow.
Starter Cutting Tools and How Material Affects Your Choices
Start with a small tool set that matches the material you're cutting. For most first setups, you only need a few basics: flat end mills, ball nose end mills, and drills.
Material changes the tool choice more than many beginners expect. Use carbide for metals like aluminum and brass. Use HSS for softer materials. If you want better grip and less vibration, hydraulic or shrink-fit holders are worth a look. And when you're cutting curved or sculpted surfaces, ball nose end mills are the go-to option.
Workholding and Measurement for Multi-Angle Setups
Cutting tools matter, but fixturing is what keeps the part where it should be. In 5-axis work, the goal is usually to clamp once and machine as many faces as possible. That's where things either go smoothly or fall apart.
Your fixture needs to hold the part firmly while still leaving enough room for the tool and spindle to reach angled features. In practice, that often means using specialized 5-axis vises, modular fixtures, or soft jaws. It also helps to center the workpiece so you get as much rotary clearance as possible.
For measurement, use probing or edge finding to locate the part origin with care. On a 3-axis machine, each manual re-fixture adds ±0.001–0.003 in. of positional uncertainty, and that error can stack up over several setups. That's why reliable probing or edge finding matters so much when you're trying to hold position across multiple angles.
Software and First-Project Workflow
From CAD to CAM to Machine Control: The Basic Pipeline
Once the part is clamped and zeroed, the software side starts.
You create the part in CAD, then bring it into CAM as a STEP, IGES, or STL file. From there, set the stock size, define the part zero, pick your tools, and build the toolpaths. After that, run everything through a post-processor to get controller-ready G-code, then load the tools into the ATC and set work zero.
That’s the basic flow: CAD → CAM → post-processing → machine control.
Before you cut anything, use simulation to spot collisions. Then run a dry cycle above the stock. It takes a little extra time, but it can save a tool, a fixture, or the whole setup.
For a first project, the safest path is usually indexed 3+2 moves instead of full simultaneous 5-axis cutting. Think of it as learning to drive in an empty parking lot before getting on the highway.
How AI-Assisted Workflows Shorten the Learning Curve
On a desktop machine, the biggest plus is simple: you can get to a first cut faster with less CAM setup.
The usual CAD → CAM → post → run pipeline asks for a lot of knowledge up front. For a beginner, that can turn into hours or even days before the first successful cut.
AI-assisted systems can shorten that path. The TOPFAB TF500 and its TopStudio ecosystem let you generate a 3D model from an image, use a built-in model library, and run integrated toolpath and post-processing workflows without writing G-code for the core workflow.
Here’s how the two paths compare on the steps that matter most for beginners:
| Step | Traditional Workflow | AI-Assisted (TF500 / TopStudio) |
|---|---|---|
| 3D Modeling | Manual CAD design | Image-to-3D generation or built-in model library |
| Post-Processing | Manual machine-specific post-processor setup | Integrated, automated post-processing within the ecosystem |
| Setup / Zeroing | Manual edge finding and tool length measurement | Automated smart probing and Dynamic Work Offsets (DWO) |
Neither path is better in every case. The traditional workflow gives you more control. The AI-assisted route gets you cutting sooner and helps trim down early mistakes.
Running Your First Safe Project in Wood, Acrylic, or Aluminum
Once the workflow is set, keep the first project simple and low-risk.
Start with wood or acrylic, use a simple part, check tool length and WCS, simulate the job, run it dry above the stock, and cut with conservative feeds and speeds.
If you’re tempted to jump straight into aluminum with a tricky shape, it’s smarter to hold off. Your first win should be boring in the best way: safe, smooth, and repeatable.
Safety, Maintenance, and Deciding If Desktop 5-Axis Is Right for You
Shop Safety Rules and a Routine Maintenance Checklist
After simulation and dry runs, the next job is simple: protect the machine, the part, and yourself.
Before the first cut, put on safety glasses, hearing protection, and a dust respirator. If you're cutting wood or acrylic, dust collection matters a lot because it keeps fine particles out of the air and off every surface in the shop. For aluminum and brass, use air blast or coolant to clear chips so material doesn't weld to the tool in the middle of a cut. An enclosed machine like the TF500 helps keep chips, dust, and noise inside the machine instead of all over a home shop. And before you start the spindle, find the emergency stop button first.
A 5-axis machine only does its job well if it stays accurate. Here’s a practical maintenance checklist:
| Frequency | Task | Why It Matters |
|---|---|---|
| Daily | Clean chips and debris from the work envelope | Prevents mechanical interference and buildup |
| Daily | Run a spindle warm-up cycle | Stabilizes the spindle before precision cuts |
| Weekly | Check collets and holders for wear | Worn holders hurt surface finish and accuracy |
| Weekly | Lubricate linear guides and ball screws | Keeps axis movement smooth and reduces wear |
| Monthly | Check machine repeatability on the A/C axes | Confirms rotary axes stay calibrated over time |
| Monthly | Inspect coolant and ventilation filters | Maintains proper temperature and air quality |
Pay attention to early warning signs. Noise, vibration, chatter, or rough surface marks usually mean something is off. That could be tool wear, weak rigidity, or a calibration problem that needs a closer look.
Is a Desktop 5-Axis Machine Worth the Cost for Your Work?
Once the machine is running safely and holding calibration, the next step is figuring out whether 5-axis makes sense for the parts you make.
If your work is mostly flat or single-sided, 3-axis will do the job. If your parts need machining on four or more faces, curved shapes, or undercuts, 5-axis starts making a lot more sense.
Cost is where the math gets interesting. Industrial 5-axis shops often charge $125 to $200+ per hour. So if you're sending parts out on a regular basis, a desktop 5-axis machine in the $10,000 to $20,000 range can start paying for itself fast, especially for repeat jobs.
There is a plain tradeoff here: 5-axis takes more CAM skill and comes with a steeper learning curve. If you don't want to deal with that yet, starting with 3-axis is a smart move. But if you're building complex prototypes or trying to cut outside shop delays, a good desktop 5-axis machine can close that gap fast.
Conclusion: A Clear Starting Path for New 5-Axis Users
With the basics covered, the next move is to pick a simple first project and build skill from there.
5-axis machining lets you make complex parts in fewer setups and with better consistency. Start with the core terms. Then learn indexed 3+2 before jumping into full simultaneous motion. Choose a machine and tooling that fit your materials, simulate the toolpath, and run a dry cycle before the first real cut. After that, move into full simultaneous 5-axis work as your skill grows.
Compact systems like the TOPFAB TF500 give new users a simple way in, with an enclosed design, AI-assisted workflows, and built-in toolpath processing that shortens the CAD-to-cut gap. Keep safety first, simulate every job, and make the first few projects easy. Save the hard stuff for later.
FAQs
Do I need simultaneous 5-axis, or is 3+2 enough?
It depends on your part requirements.
Use 3+2 indexing - where the rotary axes position the part and lock before cutting - for prismatic parts with features on multiple faces, simple angled holes, or when you need to keep costs down and CAM work simple.
Choose simultaneous 5-axis when the part has complex 3D surfaces, deep cavities, or compound angles that need the tool to keep changing orientation during the cut.
What kinds of parts benefit most from 5-axis CNC?
Parts with complex geometries tend to get the most out of 5-axis CNC. That includes impellers, turbine blades, medical implants, and freeform sculpted surfaces.
It’s also a strong fit for parts with deep cavities, undercuts, or multiple angled faces. When you machine those parts in a single setup, you can get a better surface finish and tighter positional accuracy. On top of that, it cuts down on setups and cycle time.
How hard is it to learn 5-axis CNC as a beginner?
Learning 5-axis CNC is a big step up from 3-axis machining, so the learning curve is steeper. It takes patience, persistence, and a solid grasp of the basics, like coordinate systems, tool geometry, and G-code.
The hardest part for many beginners is picturing how the machine moves and tilts during a job. That’s why it helps to start with 3+2 machining and simple practice parts in soft wood or acrylic before taking on more complex work.


