

Desktop CNC Machines: 7 Things to Check Before Buying
If I get this wrong, I waste money twice: once on the machine, and again on upgrades, tooling, and setup gear. For most buyers, the right pick comes down to 7 checks: frame rigidity, spindle power and RPM, usable work area, axis count, tooling and workholding, software fit, and total ownership cost.
Here’s the short version:
- Wood, MDF, and acrylic usually fit a lighter desktop router.
- Aluminum and brass need a stiffer machine, better motion parts, and more spindle torque.
- 3-axis is enough for flat parts and signs.
- 4-axis or 3+2 helps with multi-side and rotary work.
- True 5-axis only makes sense if I need constant tool-angle changes, undercuts, or complex curves.
- The sticker price is only part of the cost. A good planning rule is about 40% extra for tooling, dust collection, workholding, and software.
- Entry machines can start under $1,000, while desktop mills and 5-axis systems can run from $5,000 to $12,000+.
What I’d check first is simple: Can the machine cut my material without flexing, and can it fit my part, fixture, and tool stack? If the answer is no, the rest of the spec sheet does not matter.
Quick comparison
| Check | What I’m looking for | Why it matters |
|---|---|---|
| Rigidity | Steel/cast frame, linear rails, ball screws for metal work | Less chatter and drift |
| Spindle | RPM for wood/plastic, torque for metal, proper cooling | Better cut quality over long runs |
| Work area | Usable travel plus enough Z clearance | Parts, vises, and rotary setups must fit |
| Axis count | 3-axis, 4-axis, 3+2, or full 5-axis | Matches part shape and setup count |
| Tooling | Collet size, short stickout, stable workholding, ATC/QTC/manual | Affects finish and job time |
| Software | CAM post support and controller file compatibility | Toolpaths must run as intended |
| Total cost | Machine price + about 40% for extras | Stops budget surprises |
So before I compare brands, I’d use these seven checks to rule out machines that don’t match my material, part shape, and shop setup.
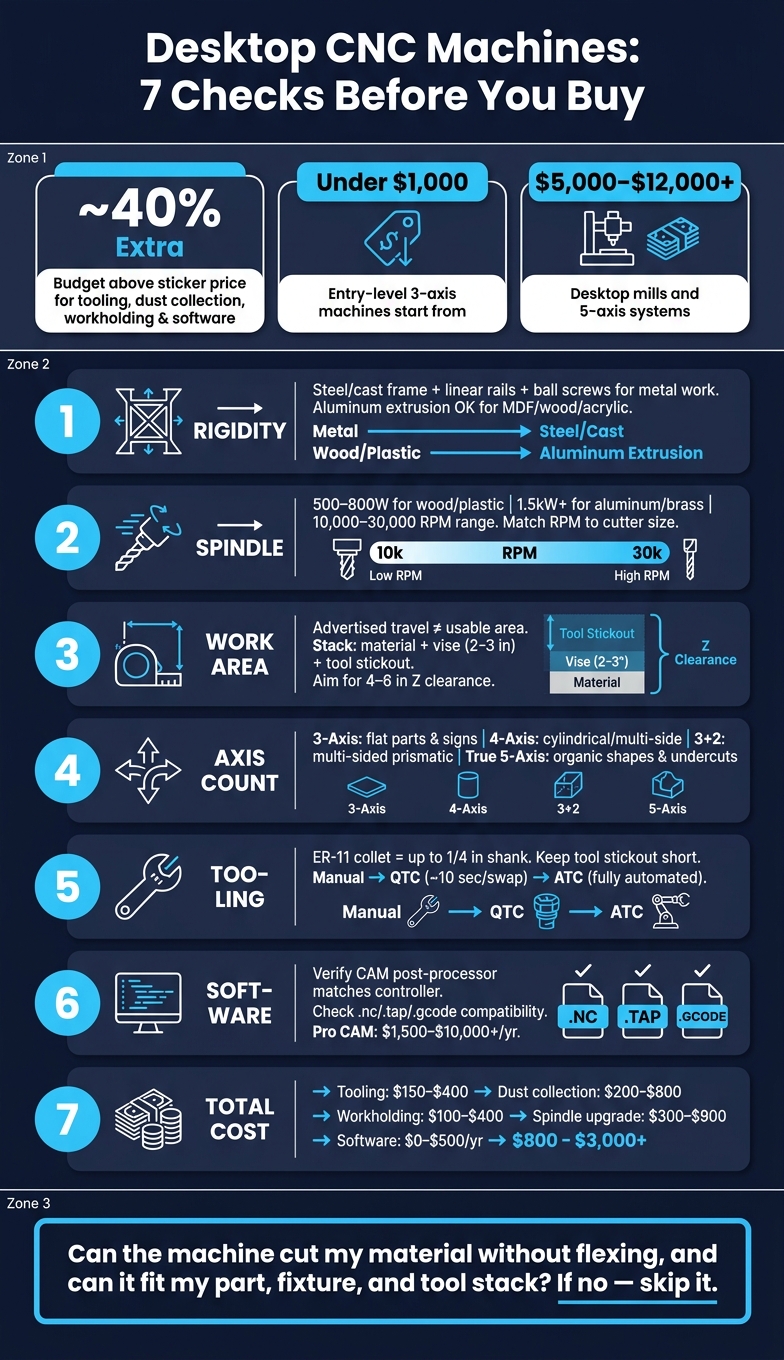
Desktop CNC Machine Buyer's Checklist: 7 Key Checks at a Glance
Buying a CNC? The Expert's Checklist for Making the Right Investment
sbb-itb-0a29f4d
1. Machine Rigidity and Frame Construction
Rigidity affects three things right away: chatter, accuracy, and the range of materials a machine can handle.
Light aluminum frames tend to flex when you cut metal. That may be fine for MDF, acrylic, or soft wood. But for steady aluminum or brass work, welded steel or cast frames do a much better job of resisting deflection and vibration.
That said, a stiff frame alone doesn't save you. If the motion parts are loose, the machine still drifts off target. Profile linear rails with recirculating ball bearings usually hold accuracy longer than V-wheels. V-wheels wear over time, and that wear turns into slop. On the drive side, ball screws offer the best stiffness and accuracy. Belts stretch under load, and lead screws tend to be slower and less precise than ball screws.
Use the table below as a quick screening tool for material fit.
| Frame Type | Motion / Drive System | Best For |
|---|---|---|
| Aluminum extrusion | V-wheels; belts or lead screws | MDF, soft wood, acrylic |
| Heavier extrusion / partial steel | Linear rails; lead screws | Hardwoods, light aluminum |
| Welded steel / cast frames | Linear rails; ball screws | Aluminum, brass, production runs |
Here's the simple gut check: if the machine feels light or you can make it flex by hand, it's probably the wrong pick for regular metal work.
Once the frame and motion system clear this step, look at spindle power and cooling.
2. Spindle Power, RPM Range, and Cooling
Once the frame is stiff enough, the next job is matching spindle power and RPM to the material you're cutting. Wood and plastics want speed. Aluminum and brass want torque. For wood, MDF, and acrylic, 500W to 800W handles most hobby and small-shop work. If you plan to cut aluminum and brass on a regular basis, step up to 1.5 kW or more.
RPM matters just as much as wattage. High RPM - 20,000 and up - works best for small-diameter bits and fine detail in wood and plastics. Acrylic is a good example of why this matters: if speed and feed don't match, it can melt. Metals are different. Lower RPM with more torque tends to matter more there.
Most desktop routers run at 10,000 to 30,000 RPM. Mills usually run slower, but they deliver more torque. So don't pick a spindle by wattage alone. Pick the RPM range based on your cutter size and the material in front of you. On a 5-axis desktop machine like the TF500, high RPM helps with fine detail and angled toolpaths in a single setup.
Then there's cooling. This part has a direct effect on how long the spindle can keep performing at the same level. Heat during long runs can shift zero and reduce accuracy. Air-cooled spindles are simpler and easier to maintain, but they make more noise. Water-cooled spindles run quieter, though they add plumbing. If you're doing long jobs, look for a cooling setup that stays quiet and steady from start to finish.
3. Usable Work Area, Axis Travel, and Z Clearance
After rigidity and spindle power, fit is the next hard limit. And this is where a lot of buyers get tripped up.
The number on the spec sheet is not the same as your usable cutting area. Advertised travel tells you the maximum mechanical movement on each axis. In day-to-day use, though, clamps, touch probes, fixtures, and even the cutter diameter eat into that space.
Z clearance deserves extra attention too. Z travel is how far the spindle moves up and down. Z clearance is the open space under the gantry. That gap decides whether your vise, rotary axis, or thicker stock will even fit.
A simple way to size this out is to add your full stack:
- Material thickness
- Vise or fixture height
- Tool stickout
That stack gets big fast. A low-profile machinist's vise alone can be 2–3 inches tall. And many entry-level 3018-class machines give you only about 45 mm (~1.8 in) of usable Z height. That's fine for thin stock, but it gets tight in a hurry.
For more general work across wood, acrylic, and metal, aim for at least 4–6 inches of Z clearance.
One more thing: don't size your setup around the work envelope alone. You'll also need bench space for gantry overtravel, cable chains, and dust hoses.
Once the machine envelope fits your parts and fixtures, then it makes sense to compare whether you need 3-axis, 4-axis, or true 5-axis motion.
4. Axis Count: 3-Axis vs. 4-Axis vs. True 5-Axis
Once you’ve nailed down your work envelope, the next call is axis count. And this one has a big impact on what you can make.
A 3-axis machine is the go-to pick for flat parts, pockets, signs, and most 2.5D work. If cost matters, this is usually where buyers start. Entry-level 3-axis machines come in at under $1,000, while stronger mid-range models usually sit between $1,500 and $4,000. For a lot of shops and hobby setups, that’s more than enough.
If your part needs to rotate - say it wraps around a cylinder or needs access from the side - a 4th axis starts to make sense. It lets you handle cylindrical parts and multi-side work without stopping to re-clamp the part by hand. That cuts setup time and helps avoid alignment mistakes that can creep in during re-clamping.
Then there’s 3+2 machining. This means the machine tilts or positions the part at a fixed angle, locks it there, and then cuts using normal 3-axis toolpaths. Simple idea, big payoff. You can machine multi-sided parts in a single setup without stepping into the full CAM and motion demands of true simultaneous 5-axis.
True simultaneous 5-axis is a different beast. It’s built for organic shapes, undercuts, and deep cavities where a fixed tool angle just won’t get the job done. Desktop 5-axis machines like the TOPFAB TF500 aim at that kind of work, with high-speed spindles and tight positioning specs. But here’s the plain truth: it only makes sense if your parts need nonstop tool-angle changes. If they don’t, 4-axis or 3+2 is often the smarter buy. The downside is pretty clear too - more cost, more CAM work, and more setup complexity.
One thing trips people up all the time: more axes do not automatically mean better parts. If the frame flexes, extra motion won’t save you. Rigidity still has the final say in cut quality. Axis count gives you more geometry options, but frame stiffness still sets the ceiling for day-to-day accuracy.
Use the table below to match the machine’s motion to the kind of parts you want to make.
| Configuration | Best For | Cost | Setup Count |
|---|---|---|---|
| 3-Axis | Flat parts, pockets, signs, 2.5D carving | Lowest | Multiple manual flips |
| 4-Axis | Cylindrical work, multi-side indexing | Moderate | Fewer manual re-clamps |
| 3+2 (Positional 5-Axis) | Multi-sided prismatic parts | Higher | Single setup |
| True Simultaneous 5-Axis | Organic shapes, undercuts, complex curves | Highest | Single setup |
5. Tooling, Collets, Workholding, and ATC Options
Once rigidity, spindle power, and travel look good, the next step is simple: check how the machine holds the material and how it handles tool changes.
Collet size controls which bits you can run. On desktop spindles, ER-11 is the standard most people see. It supports shanks up to 1/4 inch (6.35 mm), which covers the two sizes used most often: 1/8 inch (3.175 mm) and 1/4 inch (6.35 mm). ER-11 collets are cheap, easy to find, and sold in common imperial and metric sizes.
The material you cut also shapes your tooling choice. Aluminum and plastics usually need 2-flute or single-flute end mills so chips can clear fast. Wood works well with 2- or 3-flute bits. And for 3D contours, ball nose bits are usually the default pick. One small detail makes a big difference here: keep tool stick-out short. The more the bit hangs out, the more chatter you get, and that often means a rougher finish, especially in metal.
Workholding has a direct effect on stability and repeatability. A lot of entry- to mid-tier desktop CNCs come with T-track tables and basic hold-down clamps. That setup is fine for many jobs, but if you're making repeat metal parts, a vise is usually faster. Double-sided tape can work for thin sheet stock, but don't trust tape alone. Add a physical fence or a dowel pin stop behind it so the part can't shift under load.
Tool changing is where the gap between machine tiers becomes obvious. Entry-level machines are fully manual. That means every tool swap stops the job, requires a hand change, and usually forces you to re-zero. Mid-range machines such as the Carvera Air speed that up with a quick tool changer (QTC), cutting swap time to about 10 seconds per tool. The TOPFAB TF500 takes it a step further with an 8-tool automatic tool changer (ATC). Compared with QTC setups, ATC is the better fit for unattended small-batch production.
| Tool Change Method | Typical Setup Time | Best For |
|---|---|---|
| Manual | Several minutes per swap | Single-tool jobs, hobby use |
| Quick Tool Changer (QTC) | About 10 seconds per swap | Multi-tool projects, prototyping |
| Automatic Tool Changer (ATC) | Fully automated | Small-batch production, unattended runs |
After tooling and workholding, the next thing to compare is software compatibility and CAM workflow.
6. Software, CAM Support, and AI Workflow
Software shapes how fast you can go from idea to finished cut. It also decides how much hands-on setup each job takes.
Most desktop CNCs follow a simple chain: design the part, create toolpaths in CAM, then send G-code to the machine controller. Open GRBL-based controllers work with free senders like Universal Gcode Sender. That gives you more freedom, but you’ll usually need to put the software stack together yourself. By contrast, integrated systems like Makera’s built-in CAM handle more of that work for you. That can make the early learning curve easier, even if it narrows your choices later. That’s why post-processor support and file compatibility matter so much.
Before you buy, check two things:
- Your CAM software has a post-processor for the machine
- The controller accepts standard
.nc,.tap, or.gcodefiles
If the post-processor doesn’t match, your toolpaths won’t run the way they should.
With 5-axis desktop machines, software can matter just as much as the motion system. The TF500’s AI-CAM can turn a photo or sketch into a starter mesh and a roughing toolpath. TopStudio also includes ready-to-cut models and cut settings for simple jobs. That kind of convenience can save time up front, but it needs to be part of the full cost picture.
It’s smart to budget for the whole workflow, not just the machine itself. CAM software, tooling, dust collection, and software licenses can push startup costs far beyond the sticker price. If you’re new to CNC, Fusion 360’s free personal-use license covers a lot. Still, check that it supports the axis count and post-processor you need before you depend on it for production work. Professional CAM can cost $1,500 to $10,000+.
7. Safety, Dust Control, Support, and Total Cost
Safety covers three things at once: you, your workspace, and the machine itself. Start with the basics. Make sure the E-stop is easy to reach from the operator position. Then look for limit and homing switches that help stop crashes into the frame.
After that, pay close attention to dust, chips, and noise control. This part gets overlooked all the time, and it shouldn’t.
Open-frame machines make it easier to load material and access the cutting area. But there’s a tradeoff: chips and fine dust can spread everywhere. That matters even more with wood and MDF, since wood and MDF dust is a known carcinogen.
Enclosed machines do a much better job of keeping debris contained. They also cut noise a lot. The TF500, for example, comes with a fully enclosed safety design, an automatic safety door, and a built-in HD camera for remote monitoring, with noise levels at about 50 dB.
If you plan to run a machine indoors, set aside $200–$800 for a dust shoe and a HEPA-rated extractor. If you’ll be cutting aluminum or brass, add chip guards plus air blast or mist coolant. Those aren’t “nice to have” extras. They’re part of the actual machine budget.
And that leads to a bigger point: base price is not total cost. A machine may look affordable at first glance, then get a lot more expensive once you add the gear needed to use it well. A good rule is to plan for about 40% on top of the base machine cost for tooling, dust collection, workholding, and software.
| Accessory Category | Estimated Cost (USD) |
|---|---|
| Tooling (end mills) | $150–$400 |
| Dust collection (shoe + extractor) | $200–$800 |
| Workholding (clamps, T-track) | $100–$400 |
| Spindle upgrade (if needed) | $300–$900 |
| Software licenses | $0–$500/year |
Support matters too. Before you buy, check the warranty, confirm how support works, and look into parts availability. If a spindle bearing fails or a belt wears out, you don’t want to find out later that parts are hard to get. Verify U.S.-based support directly with the manufacturer, and make sure spare parts like spindle bearings, motors, and belts are available and can be shipped within the United States.
Use these ownership costs to judge the spec sheet - not just the sticker price.
Key Specs to Compare Side by Side
After you’ve worked through the seven buying checks, this side-by-side view helps you narrow things down fast. The goal here is simple: compare the specs that have the biggest effect on cut quality and day-to-day use - frame stiffness, drive system, tool changes, enclosure, and workflow.
| Spec | TOPFAB TF500 | Makera Carvera | Entry 3-Axis (e.g., Genmitsu 3018-PRO) |
|---|---|---|---|
| Price (USD) | Not disclosed | ~$5,449 | ~$250 |
| Axis Count | True 5-axis (simultaneous + RTCP) | 3-axis (4th axis optional) | 3-axis |
| Frame | Rigid enclosed frame | Rigid enclosed metal frame | Aluminum extrusion / V-wheels |
| Spindle / Motor | 60,000 RPM | Brushless spindle | Low-power 775 motor |
| Precision | ±0.005 mm | Not publicly specified | ~0.01 mm (theoretical maximum, not cutting accuracy) |
| Drive System | Ball screws | Ball screws | Lead screws / belts |
| Tool Changer | 8-tool ATC (automatic) | 6-tool ATC (automatic) | Manual wrench change |
| Enclosure | Fully enclosed, auto safety door | Fully enclosed | Open frame |
| Dust Control | Dust collection system included in Enhanced package | Integrated collection | None included |
| Software | AI toolpath + TopStudio ecosystem | Makera CAM / Fusion 360 | GRBL / open-source |
| Best For | Complex prototypes, metals, multi-angle cuts | Small-batch production, PCBs, aluminum | Learning, soft wood, basic engraving |
A few gaps stand out right away.
Both higher-end machines use ball screws, which helps them hold repeatability under load better than entry-level drives. That matters when you’re cutting tougher materials or trying to hit the same result again and again.
Tool changes are another big separator. An 8-tool ATC cuts downtime on multi-operation parts. If a job needs several tools, that time savings adds up fast compared with stopping for a manual wrench change every few minutes.
Then there’s the part many buyers underestimate: the extras. Tooling, dust collection, and workholding can add a lot to the total price of any machine in this comparison. A low sticker price can look good at first glance, but the full setup cost often tells a different story.
Use those differences to line up each machine with your material, setup time, and automation needs.
Which Machine Fits Your Project
The right machine comes down to three things: part geometry, material, and production volume. Start with the shape of the part. Then match the machine to the material, your output needs, and the time you want to spend on setup.
If you mainly carve wood or cut signs, a mid-range 3-axis router is usually all you need. Good options include the Shapeoko 4 and Sienci LongMill MK2.5. In this case, work area and dust control matter more than extra axes.
Aluminum and brass change the picture. With these materials, frame rigidity matters more than spindle power. A machine with a rigid, milling-focused build, plus a cast or steel frame and ball screws, is a much better fit.
Acrylic prototypes can be a little unforgiving. They need high RPM control and strong chip evacuation so the material doesn't melt during the cut.
Jewelry and other small precision parts often need machining from more than one angle. That usually means a 4th-axis rotary attachment or a true 5-axis setup. For this kind of work, tight repeatability isn't optional.
Small-batch production is where automation starts to pay off. ATC and auto-probing cut setup time and help prevent mistakes on repeat jobs. If you're making complex parts again and again, the TF500 stands out. Its true 5-axis motion and 8-tool ATC remove setup bottlenecks that 3-axis machines can't get around.
Use these use-case rules to narrow the field fast.
| Project Type | Smallest Suitable Machine Class | Key Feature to Prioritize |
|---|---|---|
| Wood carving / signs | Mid-tier 3-axis router | Work area, dust shoe |
| Aluminum / brass parts | Rigid 3-axis mill / router | Frame rigidity, ball screws |
| Acrylic prototypes | Enclosed desktop CNC | RPM control, chip evacuation |
| Jewelry / rotary work | 4-axis or true 5-axis mill | Repeatability, rotary axis |
| Small-batch production | Automated desktop CNC | ATC, auto-probing |
Use the table above to match part geometry and production volume to the simplest machine that can do the job. That makes the final spec comparison much faster and easier to sort through.
Conclusion
Plan for the machine plus about 40% extra for tooling, dust collection, workholding, and software. That’s your actual cost, not just the sticker price.
Match the machine to your main material, part geometry, and workflow, not the longest spec sheet. Wood signs, aluminum brackets, acrylic prototypes, and small-batch parts each need a different mix of rigidity, spindle speed, travel, and automation. If a machine misses one of your must-have requirements, skip it and move to the next simplest class that does the job.
Buy the simplest machine that handles your most common work. Choose based on your parts, not the headline spec.
FAQs
How do I know if a desktop CNC is rigid enough for aluminum?
Prioritize the machine’s structure over raw power. A welded steel or heavy cast frame is usually the better bet, because lightweight aluminum extrusions often aren’t stiff enough to stop chatter and deflection when cutting aluminum.
It also helps to look for linear rails and ball screws instead of V-wheels or belts. And before you buy, check that the Z-axis and spindle mount show no visible play. If those parts can move when they shouldn’t, cut quality tends to suffer fast.
What size desktop CNC do I need for my parts and fixtures?
Measure the largest workpiece you expect to cut, then pick a machine with a work area that’s a bit bigger. That extra room helps, but there’s no need to buy for some maybe-someday project. Bigger machines eat up more bench space, cost more, and can feel clumsy when you’re doing small parts.
The work envelope also needs to fit your workholding setup, including vises, jigs, or a 4th-axis rotary. And don’t stop at the part itself. Leave enough space for loading stock, managing dust, and getting your hands in safely without feeling cramped.
When is 5-axis worth buying over 3-axis or 4-axis?
A 5-axis machine is worth buying when you need to make complex parts with undercuts, deep cavities, or curved, freeform surfaces that 3-axis or 4-axis machines can’t reach in a single setup.
Because the machine can approach the workpiece from multiple angles, 5-axis cuts down on manual flipping and re-clamping. That means fewer chances for small setup mistakes to stack up, which helps with tolerance control. It’s also a strong fit for rapid prototyping and iterative design, where parts often change and setup time can slow everything down.


